The Labyrinth Dress

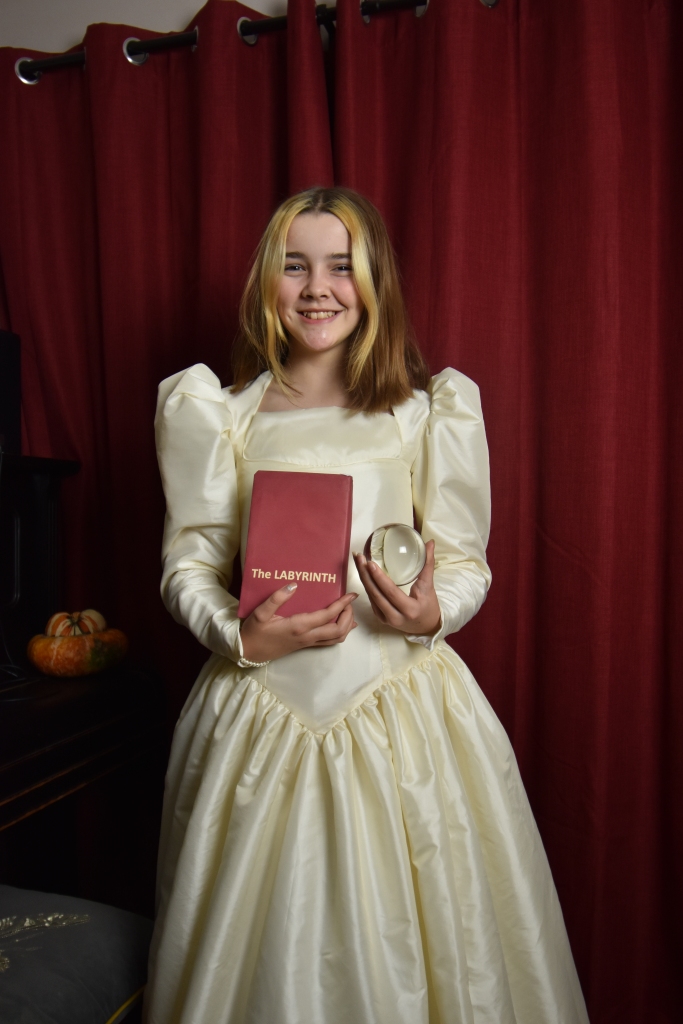
This year for Halloween my daughter decided that she would like to dress up as Sarah from the film Labyrinth (1986). I have a lot of vintage sewing patterns passed on to me and the dress in the film made me think of Style 1886, an 80s wedding dress. I did my measuring and ordering and got to work.

This dress would have been super expensive to make without a little bit of help, but luckily as a Minerva Brand Ambassador I can choose some fabric from them free of charge (only the main fabric, though). I still wasn’t sure if they would be willing to send me 6 metres of fabric at £9.99 per metre, but they were excited by the project and agreed to provide the taffeta. I ordered the rest of the supplies myself (6 metres of lining, a 22″ zip, ivory thread, net/mesh, interfacing).

I started with a size 6 toile of the bodice which was closest to my daughter’s measurements, however the pattern is drafted for an adult and so it wasn’t quite right on a pre-teen body. After the first toile I started again and draped and pinned the fabric directly on her to make my own darts where necessary. The back needed no darts, and the front only needed one each side rather than two, and they were a lot narrower too.
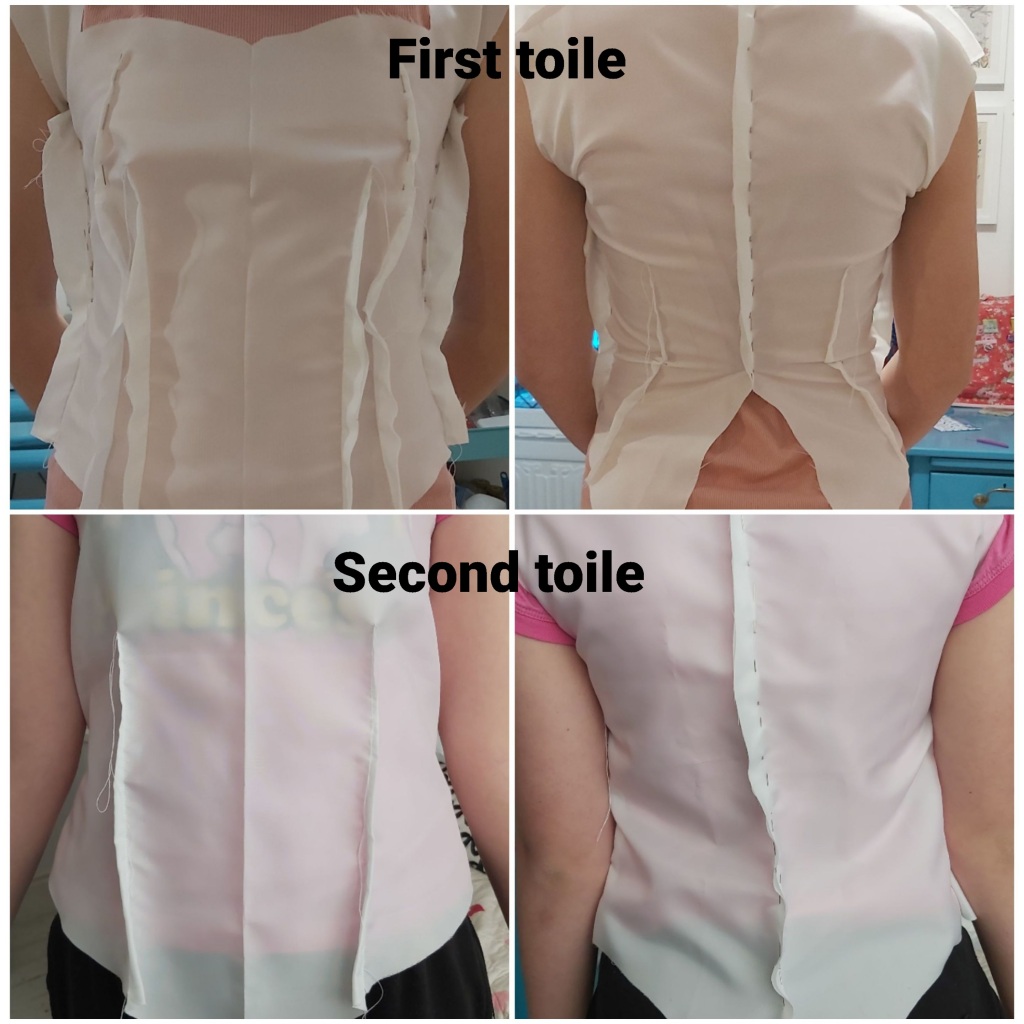
At this point my daughter asked for the neckline to be higher, so as I cut the main fabric I rounded out the sweetheart neckline into a gentle curve that came up an inch or so higher than before. When the dress was finished, however, she still thought it was too low, so I added in an extra panel across the top of the bodice! As a result the neckline is nothing like planned but at least she is happy with it!

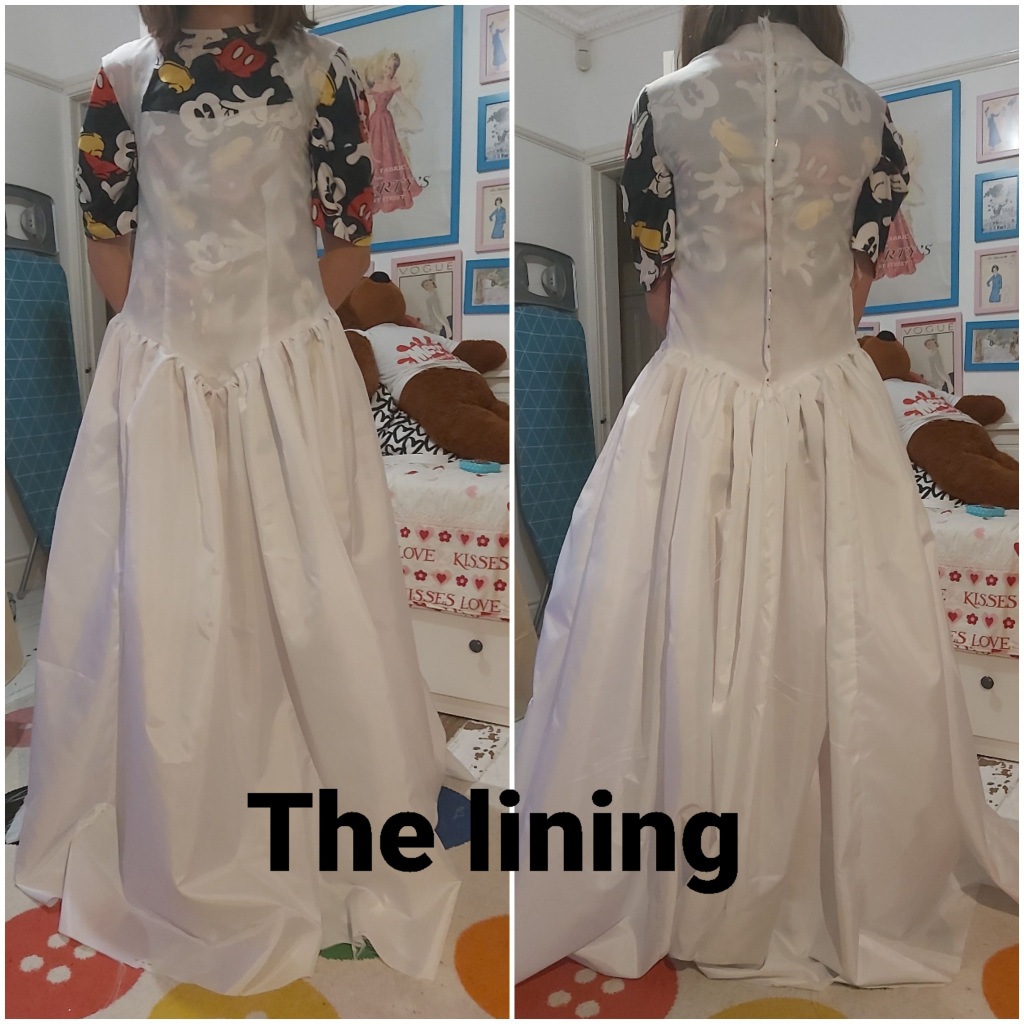
When I was choosing which kind of lining I wanted I noticed that Minerva have several types available and wondered if it was worth paying £1 more per metre to get the ‘premium’ anti-static lining rather than the regular lining. I opted for the premium and I do think it is that little bit more opaque then the regular kind, and a little less flimsy, which came in handy when I was gathering the huge skirt panels!
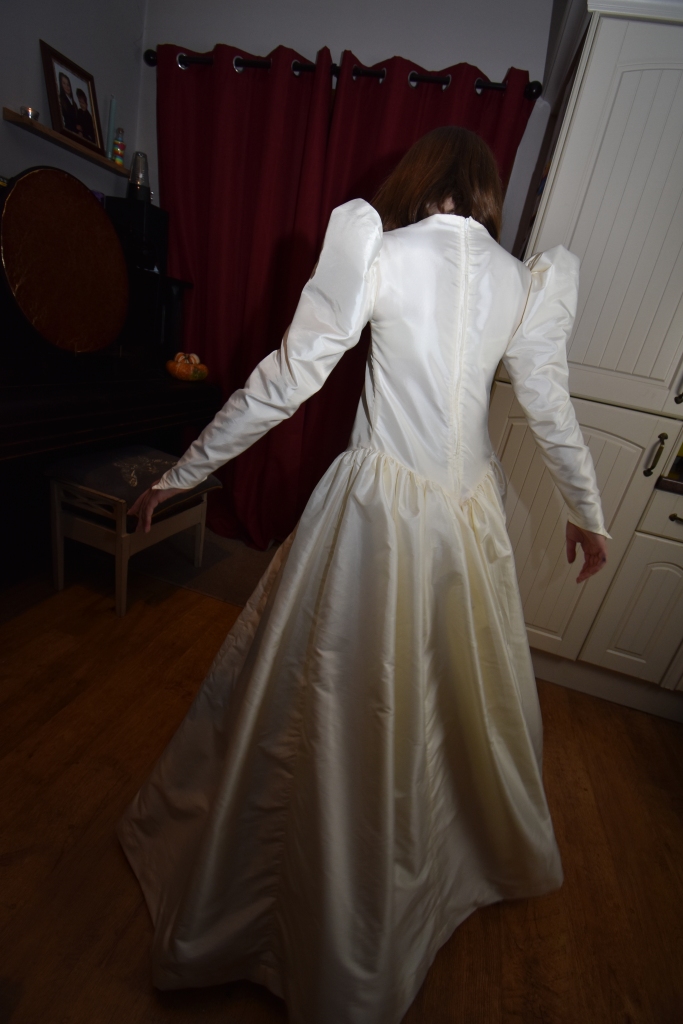
There are lots of shortcuts I took in making this dress that I would never dream of doing if I were making a real wedding dress: for instance I just serged all the seams to finish them rather than going to the effort of doing French seams. When I was hemming the dress I was in a rush so both the lining and the main fabric are hemmed by machine and without pinning or measuring!!! Finally the sleeves are so epic that even with the tightest possible gathering I couldn’t fit them into the arm hole so you might find some tucks and folds lurking if you were to scrutinise them! Even with these shortcuts, from first fitting to final garment took me a good few days.


Overall I’m pretty pleased with it and my daughter was happy to wear it. I do wonder if it can be repurposed or adapted to wear again at some point as it does seem a shame to only wear it the one time!
Waves and Wild Heyday Dungarees

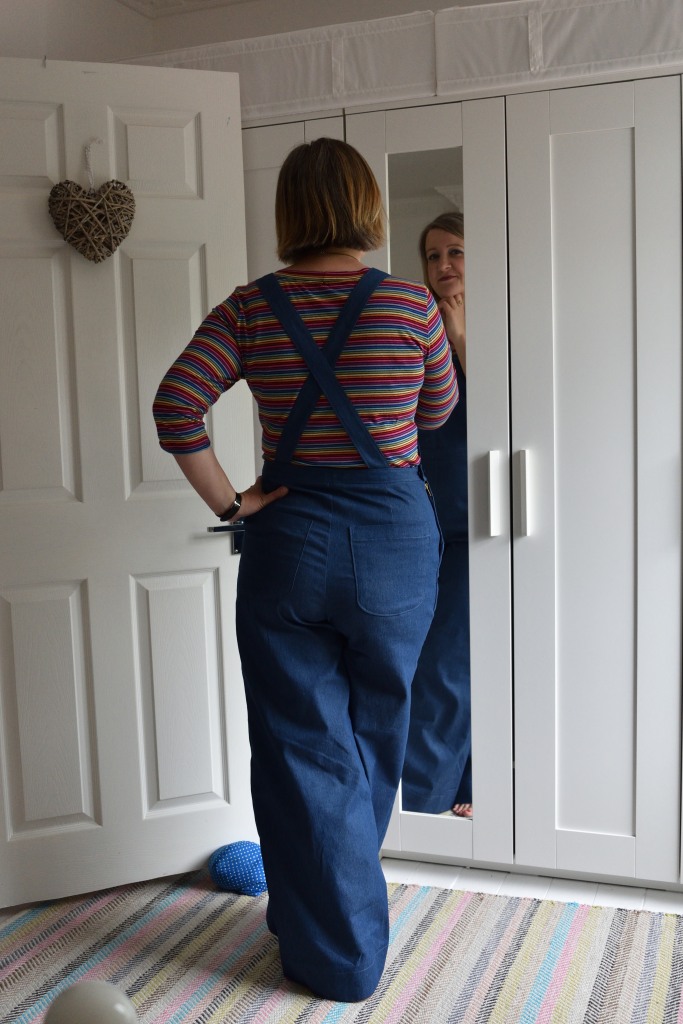
I am so pleased with my new dungarees made with fabric from Minerva! As a Minerva Brand Ambassador I get to choose fabrics to review and once I got my hands on the Waves and Wild Heyday Dungarees pattern, I was thrilled to be able to test out this cotton canvas fabric in the most beautiful teal colour. I really like my pair of Lucy and Yak dungarees and I wanted to be able to make myself endless pairs without paying a fortune, so I finally got around to buying the Heyday pattern from Waves and Wild which is pretty similar in design.

I got the pattern printed in A0 size at a copy shop so I didn’t need to piece together a4 sheets, which made making these dungarees a breeze! The pattern is really simple because as you can see, there’s not much fitting involved or even shaping or closures!
I prewashed, dried and ironed the fabric in case of shrinkage, and got to cutting. I did alter the pattern by lengthening the bodice and the legs by one inch each (i.e. at the lengthen/shorten lines provided in the pattern design). I’m glad I did this as a long bodied person I think the rise would have been verging on uncomfortable had I not, and I wouldn’t have been able to turn up the ankles.
The fabric is a dream to sew, and although it’s quite sturdy it didn’t give me chub rub on the inseam as it softens up nicely!

The only problem I had with these was that I didn’t adjust the pocket placement after having added in extra length to the top part, so the pockets sat a little too low for my liking. So much so, I had to remove the front two pockets before I could wear it as they looked a bit silly. The back pockets are still a bit low, but they’re not as much of a focal point (at least not for me!), so I didn’t bother removing them!

I wore the dungarees on the way to Paris, and then for the day when we went to Montmartre. They are really comfy and I love the colour, and they have washed really nicely. These are definitely as good as my Lucy and Yak’s in term of quality!

Thanks Minerva for providing me with 2.6m in order to make these! I’ve already cut a second pair in some fabric I bought from Tissus Reines.

Tilly & the Buttons Indigo Dress

In November 2021 I went to the Knitting and Stitching Show in Harrogate with my friend Jennie and brought some fabric back with me as a souvenir. I was very restrained, it was the only fabric I bought there, although I did buy Jennie a felt toy kit that you hand sew yourself (pictured below), and some cord from Stitching Me Softly to make myself a macrame necklace. The macrame cord I bought at the show was mustard yellow, but once I made that one I got a little obsessed and bought more cords in different colours. You can see one of the necklaces I made with teal cord in the photos of the Indigo dress as I’m wearing them together.

Anyway, back to the fabric! It’s a cotton jersey (Oeko-tex) dress in a teal/denim blue with black specks. The selvedge says it was made in the Netherlands and designed by Stenzo Textiles. I can’t remember the exact cost but it was probably something around £12-13 per metre and I bought 2 metres.

I had the Tilly and the Buttons Indigo dress in mind for the fabric, although I didn’t own the pattern yet, so I asked for that for Christmas from my sister-in-law and her husband. Had I consulted the pattern first I would have bought more fabric, as you do need over 2m for the dress! When I started cutting the fabric I soon realised I’d have to jiggle things around a bit in order to get all the pieces. I didn’t have enough to cut the back bodice on the fold, so I cut two and as a result my dress has a centre back seam on the bodice. I also had to cut either the sleeves or the flounces on the cross grain – I can’t remember which now! I hardly had any leftovers at all, which was a bit disappointing since I’ve been using up scraps of jersey to make underwear recently!

I hesitated on a few of the design features of the dress. First of all, I really like the exposed frill seams option, but decided to go with gathered instead because a) the wrong side of the fabric is white-based, so that wouldn’t look nice and b) the instructions for this method were really long!!! My second decision was whether or not to have plain sleeves or sleeve flounces. The practical side of me thought plain long sleeves would be better, but in the end I couldn’t resist the flounces because they are pretty. I have no regrets, even though the other day my sleeve accidentally dipped in my son’s dessert as I reached across him at the dinner table!

I really love the finished garment. The loose fit means I can layer it over long sleeve tshirts and it is really soft and comfortable but pretty as well. I will definitely be making more Indigo dresses!

Birthday dresses for birthday girls!

Today I want to show you two dresses I made for two sisters who have October birthdays. I didn’t make them matching or coordinating dresses like I have done in the past when I made their Kitty Pinafore dresses. I used different patterns and different fabrics for each dress. The first dress is made with Simplicity 2265 in a fabric which was given to me and which I find hard to identify. It has a twill weave and is a bit like sateen but not as thick. The print is ditsy floral and is reminiscent of Liberty.

The fabric also has an embellished border of white ribbon stitched down to make large flower shapes.

The first dress has some beautiful design features such as the two-part, tulip style overlapping sleeves, the pleats at the centre of the bodice and the back button closure.


This dress took quite a lot of work compared with your average kid’s dress. I am pleased with the border print fabric on this dress, but I think the bodice pleat detail gets lost in the print, which is a shame, but it is still pretty!

It’s pretty from the back too and you can see the sleeve detail a bit better from this angle.

The second dress is made with New Look pattern 6205, and is made with a pink vintage-style floral polycotton. The print reminds me of a floral sofa cover my grandma had! I know that the 5 year old who would be wearing this dress loves wearing reds and pinks so I hoped she would like the print.

The second dress is a simpler pattern, although I opted to add a skirt lining rather than only lining the bodice because the polycotton was fairly lightweight and I wanted the pale pink background to really pop. Although the pattern for this dress is more straightforward than the other dress, I still think the design is really beautiful. I used the pattern for a bridesmaid’s dress some years ago and then made my daughter a couple of other versions of it. I love the full pleats in the skirt and the neckline/sleeve design.

This one fastens at the back with a zip and I decided to use a standard dress zip as I find them kinder on the skin as well as being a more traditional style.

I had trouble deciding on whether or not to include a sash, and which colour to go for! The dark green is a good contrast.

Both girls love their dresses!
Rainbow Straps Dungaree Dress & Macrame Necklace

At least a year ago, maybe longer, I was in the haberdashery of Boyes and saw this wide rainbow webbing tape, and had the idea to make a Tilly and the Buttons Cleo pinafore dress using the tape as dungaree straps. I have made lots of different versions of this dress but I had always fancied a plain denim one, so I ordered some Lady McElroy 11oz organic denim and some Hemline dungaree clips from Minerva.

When I finally got the urge to actually sew the dress, I had a last minute wobble about whether or not to make the dress with rainbow straps. Part of the appeal of the plain denim dress was that it was utilitarian. However, I also knew that rainbow straps would be really fun, and make the dress more unique, and what is the point of being able to make your own clothes if you make things that look just like everybody else’s? Might as well put a design spin on it!

The straps that Tilly drafted are quite narrow, and in the past when I have made this dress with standard dungaree clips I have found them a little too wide for the straps. The rainbow straps are even more narrow than the straps should be according to the pattern, but it’s hard to source the narrower clips (I did manage it for my Art Gallery Dinosaur Canvas version of the dress, though, so they are out there somewhere!).

I fully lined the dress so that it doesn’t cling to my clothes underneath. I tucked the hem of the lining into the hem of the denim and topstitched it down, which actually makes the dress wrinkle a bit when the denim stretches but the lining doesn’t. I could unpick it and hem them separately if it starts to get really noticeable but so far it’s ok. These photos were taken on Christmas Day after sitting down for many hours, so it was bound to look wrinkled at this point!

I made the longer length version of the pattern as I am 5’10” and find the shorter version too short now. I didn’t include the front split that you are supposed to have with the longer version, because I found with a previous version I made of the dress where I included the split as directed, there is a lot of strain on the top of the split when you sit down, and I’m always worried it’s going to rip!

I also made a different pocket than the one that comes with pattern, as I wanted it bigger and curved rather than angular. I didn’t add hip pockets but I wish I had as I miss having them. I guess the beauty of patch pockets though is that I could add some on later if I want to.

I’m also wearing a necklace I made! I bought a 2m length of Bobbiny 9mm macrame cord from Stitching Me Softly at the Knitting and Stitching Show in Harrogate in November. I didn’t buy the ‘kit’ because Emma said I could find a tutorial online, and although I didn’t find one on her Instagram account, I found one on YouTube about how to make a macrame rope necklace.

I didn’t buy the magnetic clasps from Stitching Me Softly, either. Instead I bought a batch lot off eBay which was cheaper. The 10mm wide magnetic clasps were absolutely perfect for the 9mm cord (you don’t need 9mm clasps, and will find it hard to buy these from anywhere except Stitching Me Softly). I bought 2 more not-quite-10-metre bundles of Bobbiny cord from an eBay seller for £6.99 each and with the clasps I was able to make 7 necklaces to give as presents to friends this Christmas. I’d estimate I spent £35 on eBay to make these 7 necklaces which is not bad.
I hope you all had a lovely Christmas. Were you wearing anything handmade? Did you receive any sewing-related presents? I got the Tilly and the Buttons Indigo pattern from my sister-in-law, and some fabric to make the dress with from my husband, so that will probably be my next project!
Yves Saint Laurent Mondrian Dress

Earlier this year my children took part in a ‘Time Travel Week’ at school where each year group learnt about a different decade in recent history. They learnt about the fashions, music and popular culture of the decade in question as well as notable events. My daughter’s class was learning about the 60s, and so they were invited to dress up in something related to the 60s. My mind went straight to the 1965 Yves Saint Laurent Mondrian inspired dress. I have a hardback set of Taschen ‘Fashion’ books that now seem difficult to get hold of, and as I opened Volume 1 to find the dress I had in mind, it ACTUALLY OPENED ON THAT VERY PAGE!!!! I took that as a sign, and committed to the idea!

My daughter was actually not that keen on the dress at first. I think she was hoping for something more flower power and hippy, but I managed to talk her into letting me make this dress instead by showing her loads of images of it and reading about it with her, so that she began to appreciate the importance of this YSL collection in fashion history, and that it really is one of the most standout fashion moments of the 60s.

I am aware that there is a Vogue pattern available that is inspired by this design, but I didn’t really feel the need to track it down. Instead I used a pattern for a basic shift dress and adapted it.

The pattern was an adult pattern so I cut the smallest possible size, made a toile, and then redrafted it to fit my daughter. She didn’t need the bust darts, so I removed those by rotating them to the centre front neckline, which is cleverly hidden by the central black dividing line on the finished dress front.

I have to confess I didn’t piece together the fabrics – I cheated! I chose various sections of primary-coloured cottons, placed them on in my own design, and sewed black wide ribbon over the edges to join it all together.

I kept the back of the dress plain white and inserted a lapped zipper. Because the fabric was quite heavy white cotton twill, I didn’t need to line it, and it held its A-line shape really well.

My daughter was absolutely over the moon with the dress, and I was really pleased with how well it turned out, and also slightly jealous that she had this amazing dress that fitted her so beautifully and was inspired by the wonderful artist Piet Mondrian, and the amazing designer Yves Saint Laurent.

I think it’s one of my favourite things I have ever made.
Closet Core Patterns Jenny Overalls

In January 2020 whilst on a work trip to Leeds, I picked up some stretch denim fabric from Samuel Taylor’s to make myself a second pair of Jenny Overalls, as I have loved my black ones and worn them loads. The fabric sat for well over a year, thanks to Covid, before I finally found the motivation and time to sew. Thankfully, I didn’t need to trace a new size, so I could get straight onto cutting out the denim, which saved me a lot of time and effort!
There’s probably not much more to say about this pattern that I didn’t say last time. It’s quite labour-intensive as there are lots of pattern pieces, but it comes together nicely and both times I have made dungarees with this pattern I’ve ended up with a very neat and precise finish, which is good. I love how the side zip turned out. I wish I had used more exciting pocket fabric!

I didn’t topstitch in a contrasting colour because I just wanted it to be plain, and therefore extremely versatile.

I really love the wide legs of these dungarees, they are just soooo comfy! I can wear knee high boots underneath! They look good with lots of my t-shirts, but this rainbow stripe Threadcount Patterns ‘Ultimate t-shirt’ is one of my favourites.

I ordered the dungaree clips from eBay I think, and went for classic bronze with matching jeans buttons – the kind that you have to hammer into place, which is always fun!

These clips also came with the extenders which I’ve not used before. They were quite fiddly to sew in but definitely worth the effort for the ability to adjust the strap length.


I’m super pleased with these and have worn them loads. Having a black pair as well is just great and they are both really comfy and cool and I feel good in them. Hurray!


Colette Moneta dress, a t-shirt and Ernest Wright shears!

It’s autumn! The kids are back at school and we’ve had a few weeks to get back to a kind of normal(ish) routine of kids at school and me at work. Luckily for me my work has also involved some sewing commissions and some sewing tuition, which is great, and I’ve still got a backlog of completed projects to share with some great photos taken by my husband who has become a photography enthusiast!

Today I want to show you a new Colette Moneta dress I made during Me Made May earlier this year. I have had the fabric in my stash for ages, and I think it may have been from Abakhan in Manchester, although I can’t be 100% sure. It’s a printed single jersey with a good drape, and in classic navy and white. When I bought it I obviously didn’t pay much attention to the print direction, as it was only when I came to cut it out I realised the stripes were vertical instead of horizontal! Nevermind!

I hadn’t bought this fabric with a particular pattern in mind, so had erred on the side of caution and bought more than I probably needed. This worked out well because it meant I had enough fabric left over to make a t-shirt using the Threadcount patterns ‘Ultimate t-shirt’ pattern that came free with Love Sewing. Although I liked the vertical print of the dress, I really wanted horizontal stripes on the t-shirt so I cut it on the cross grain, and it worked out just fine.

I love the swishyness of the dress, but the t-shirt has probably gotten slightly more wear overall as it looked good with my white jeans in summer and under all of my dungarees and dungaree dresses!
Around the time that I made these, my amazing shears arrived from Ernest Wright. I ordered them in October 2020 but because of the pandemic they took months and months to be made, and I finally got them around May 2021. Still, better late than never! I ordered the 10″ shears which I can just about handle – any larger and my hands would not be able to physically open the blades fully!

Tilly Agnes meets Orla Kiely

My latest sponsored make as a Minerva Brand Ambassador is a Tilly and the Buttons Agnes tshirt in a fabric that is not designed by Orla Kiely but which is certainly very similar to one of her more famous designs. I was drawn to the fabric simply because of this connection, although I’ll admit that I hadn’t paid much attention to the scale of the print when I ordered it, and expected it to be larger than it is.

I want to increase my collection of me-made tshirts and slowly weed out the RTW tshirts that I don’t love as much (not my David Bowie tshirts, though, they are here to stay). My other go-to tshirt pattern is the Threadcount Ultimate tshirt pattern but this time I wanted a closer fit rather than a relaxed fit. The shape of the Agnes tshirt seems to be such an exaggerated hourglass shape but it works really well for me.

The fabric is lovely quality and I would recommend it. It’s medium weight so it behaves itself when you’re sewing it, and it isn’t too thin or too sheer. It seems to have good stretch recovery too. I used my sewing machine and my overlocker and it was so quick to make that I made it in one evening. It helped that I had already traced the pattern pieces as I’ve used this pattern before!

Thanks to Minerva for sending me the fabric free of charge in exchange for a review on their site here.

McCall’s M7094 top

This pattern came free with Love Sewing a few years ago, and I was reminded of it during Me Made May 2021 when Amy of Almond Rock Sews wore the one she made with gorgeous Liberty fabric. As a Minerva ‘Brand Ambassador’ I can choose some fabric free of charge in exchange for a review post with photos on their website, an arrangement I am more than happy with!
This top is described as a ‘very loose fitting, pullover top’ and based on my current measurements I cut a large. It did seem to be extremely voluminous when I was making it, and I worried that I would be drowned by the finished garment. In the end, though, it turned out to be wearable, although I reckon if I made it again, I would make the medium size instead, and possibly use a lighter fabric. I hesitated whether or not to choose the dipped hem as it is not something I tend to go for normally, but I thought I’d give it a go. I’m still not 100% sure I like it, and I haven’t yet ruled out straightening it off, but my family and friends seem to like it. It kind of reminds me of when in primary school we were asked to bring in an old shirt of your parents to wear backwards with the sleeves rolled up as a painting apron!

I was imagining wearing this top with white jeans, but on photo day it was raining and I opted for a navy corduroy skirt, tights and boots instead. Not quite the nautical summer vibe I was going for! I really wanted the overlapping back as I do like an interesting back detail, but I wasn’t sure how it would hang in this woven fabric which doesn’t have as much drape as the fabrics shown on the pattern envelope. I think it works ok, it certainly adds to the billowy nature of the top!

The pattern was quite fiddly really so it took me longer than average to make this top. I found the front placket attachment quite difficult to follow, it felt as though there wasn’t quite enough explanation given. I had to do a bit of guesswork and I think it’s probably not exactly how it should be, but it looks OK. Slip stitching the placket in place took quite a while, and when it came to slip stitching the yoke and neckband in place, I cheated and stitched in the ditch using my machine instead.

There is no prompting to finish the seams in the instructions, but most of them are neatly enclosed, with the exception of the side seams and the sleeve seams, which I overlocked. However, I wish I had chosen a different seam finish for the sleeves, as the rolled up part shows the inside/wrong side, so you can see the overlocked edge. I mean, it’s neat and everything, but might have been nicer as a French seam!

The fabric is a lovely quality and comes in different colours (red, navy and grey). I don’t have much yellow in my wardrobe but I liked this mustard yellow shade with the white anchor print and thought it was a bit more unusual. I can see this fabric working well for most projects that require woven, non stretch fabrics, such as tops and dresses and skirts. It doesn’t necessarily require lining, either. In these photos I am wearing a black crop top underneath but you can’t really tell. Thank you to Minerva who sent me the fabric in exchange for me posting on their site! The thread, interfacing and two little buttons were from my stash.


